As many of you found in the second robot lab, it is rather easy to make a robot move in a fixed pattern. Some also found that it is rather easy to make the robot sensitive to whisker events. But it is significantly more difficult to get both things to work together well. This problem of doing several jobs at the same time is a common one for embedded systems so it would be nice to have a standard way to approach it.
The standard method is to change from a simple procedural style of programming to an event driven style.
In the procedural style the program works on one task for some amount of time and then moves on to a different task. The flow of control is quite explicit in the structure of the program. this is easiest to visualize in an example. Let us look at the square program from lab 26. The details of your solutions vary from program to program but all of them have a structure similar to this
set the PWM to make the robot go forward
wait a second or two
set the PWM to make the robot turn to the right
wait while it turns 90°
set the PWM to make the robot go forward
wait a second or two
set the PWM to make the robot turn to the right
wait while it turns 90°
set the PWM to make the robot go forward
wait a second or two
set the PWM to make the robot turn to the right
wait while it turns 90°
set the PWM to make the robot go forward
wait a second or two
set the PWM to make the robot turn to the right
wait while it turns 90°
This fixed sequence is then repeated by putting it in the loop() routine. This is probably most tidily implemented with a few assistant subroutines to give us code something like this.
void Forward(int time) {
    PWMSetTime(LeftMotor, kLeftCCW);    // left counterclockwise
    PWMSetTime(RightMotor, kRightCW);   // right clockwise
    delay(time);
}

void Left(int time) {
    PWMSetTime(LeftMotor, kLeftCW);     // left clockwise
    PWMSetTime(RightMotor, kRightCW);   // right clockwise
    delay(time);
}

void Right(int time) {
    PWMSetTime(LeftMotor, kLeftCCW);        // left counterclockwise
    PWMSetTime(RightMotor, kRightCCW);  // right counterclockwise
    delay(time);
}

void Back(int time) {
    PWMSetTime(LeftMotor, kLeftCW);         // left clockwise
    PWMSetTime(RightMotor, kRightCCW);  // right counterclockwise
    delay(time);
}

void setup() {
    pinMode(LeftMotor, OUTPUT);
    pinMode(RightMotor, OUTPUT);
}

void loop() {
    Forward(1000);
    Right(240);
    Forward(1000);
    Right(240);
    Forward(1000);
    Right(240);
    Forward(1000);
    Right(240);
}
or, if you are clever, simply
void loop() {
    Forward(1000);
    Right(240);
}
This is a very easy to write, very easy to understand, way to write a program. But it makes it very hard to add hit detection. In an ideal world, the robot would respond to a hit on its whiskers as soon as the hit took place, regardless of where in its program it happened to be. At first sight it seems that the interrupt handler from the traffic light lab could solve this problem as easily as it solved the pedestrian button problem in that lab. However, there were only one or two places in the traffic light sequence that the system might need to respond to a pedestrian button push. In the robot case we want to respond at any point in time.
It is quite straightforward, if a trifle ugly, to add whisker testing. It makes little difference whether or not you use interrupts and I will hide that difference, simply assuming that there are routines WhiskerStrikeLeft and WhiskerStrikeRight that will tell us whether the whiskers have been hit since the last time we asked.
First, we need to note that the program spends essentially all of its time sitting in the delay subroutine, waiting for time to pass. It is during that time that we need to test the whiskers. The only way to make that happen is for us to replace the system-wide delay() routine with a special one of our own that both waits the correct amount and tests the whiskers. We can do this by alternating waiting a short time with testing the whiskers. We can start with our own version of delay.
void Wait(int time) {   // Wait time (in mS)
    for (int i = 0; i < time; i++) {
        delay(1);
    }
}
That is just a somewhat pointless replacement for delay that, like delay, waits for a user controlled number of milliseconds. But now we can do a whisker test inside the for loop and thus test the whiskers 1000 times per second. That should make them responsive enough for our purposes. Assuming we have functions WhiskerStrikeLeft and WhiskerStrikeRight, then the result will look something like this
//
// Wait for a time (in mS) while responding to whiskers
//
void WaitWhiskers(int time) {
    for (int i = 0; i < time; i++) {
        if (WhiskerStrikeLeft()) {
            Back(1000);
            Left(150);
        } else if (WhiskerStrikeRight()) {
            Back(1000);
            Right(150);
        }
        delay(1);
    }
}
We must then replace the calls to delay in Forward, Left, and Right with calls to WaitWhiskers. We don’t replace the call in Back because we really don’t want to test the whiskers when we are going backward.
There is one really nasty thing can happen in this system. Since the Left routine must call WaitWhiskers and the WaitWhiskers routine can call Left there is the rare possibility that you can start an infinite recursion. This will happen if the back-up does not clear the whisker. In that case WaitWhiskers will call Left which will immediately call WaitWhiskers and so on. This will rapidly (in a mS or so) fill up all of the memory of the computer and crash the whole system. The only cure would be to have two different Left routines, one that used delay and one that used WaitWhiskers.
If you think about the workings of this program then you will see that it spends essentially all of its time doing nothing. Since the PWM hardware takes care of keeping pulses flowing to the motors, the only times that it has to alter anything is when either a timer runs out or the whiskers are struck. This leads us to a new style of programming where we sit testing for events and only take action when events occur.
Probably the simplest program that we have written was the Blink program from the first lab. We wrote that in standard procedural style, like this.
int LED = PF_1;

void setup() {
    pinMode(LED, OUTPUT);
}

void loop() {
    digitalWrite(LED, HIGH);
    delay(100);
    digitalWrite(LED, LOW);
    delay(100);
}
Let us convert this to an event-driven style. The first thing that we shall need is a way to keep track of the time. We are most familiar with the delay(mS) and delayMicroseconds(muS) routines but I have also mentioned the routines that can read the time since the program started millis() and micros(). Since we want to work on a millisecond timescale we will want to use millis(), which returns the number of milliseconds that have elapsed since the program began. It returns them as an unsigned long, which will last for several months before we have to worry about overflow.
To use the time, we will need a variable that can hold such a number of milliseconds. Let us call it Time and declare it like this
unsigned long Time = 0;
Now, in order to wait eg. 100mS we start by grabbing the current time and then sit reading the time until we get a new answer that is 100 greater than the first.
Here is a simple semi-event-driven version of our simple Blink.
int LED = PF_1;
unsigned long Time = 0;

void setup() {
    pinMode(LED, OUTPUT);
}

void loop() {
    digitalWrite(LED, HIGH);
    Time = millis() + 100;  //  Set timer for 100mS into future
    while (millis() < Time) {
        // could do any processing you want here!
    }
    digitalWrite(LED, LOW);
    Time = millis() + 100;  //  Set timer for 100mS into future
    while (millis() < Time) {
        // could do any processing you want here!
    }
}
This emphasizes the fact that the wasted time is now available to us but it does not yet make full use of that freedom. We need another idea, the idea of stored state. This program still builds the information about what to do each time the timer goes off into the structure of the program. Now we want to make that information more explicit. I am going to introduce a new variable that will keep track of whether or not the LED is currently lit. We call such information about the actions that we have already taken and our location in the overall process state information. In this case we just need a variable that tells us if the LED is lit, a binar piece of information. We can store that in a bool variable, like this
bool LEDOn = false;
Now our loop can check to see if the timer has expired and if it has decide how to proceed depending on the state. Here is our improved event-driven Blink.
int LED = PF_1;
unsigned long Time = 0;
bool LEDOn = false;

void setup() {
    pinMode(LED, OUTPUT);
    digitalWrite(LED, LOW);     // Now sure it agrees with LEDOn
    Time = millis() + 100;      //  Set timer for 100mS into future
}

void loop() {
    if (millis() >= Time) {
        //
        //  Timer expired event has happened.
        //  Check LED state and reverse.
        //
        if  (LEDOn) {
            digitalWrite(LED, LOW);
            LEDon = false;
        } else {
            digitalWrite(LED, HIGH);
            LEDOn = true;
        }
        Time = millis() + 100;      // Have to reset timer!
}
This is in a very real way radically different. Now, instead of explicitly waiting for the timer to expire, we check to see if the timer has expired and only play with the LED if it has. As we shall see in a little while, we could then go on and check for other events in the same loop call. Thus the program could give the appearance of doing several things at once.
We have actually mixed up two different kinds of task in this simple example. One One task is adjusting the brightness of the LED. The other is deciding what to do next. In simple program this is usually the best idea. As program get more complex, however, we may need to separate these two kinds of task.
Our first task is to convert our original square-walking robot program to use the event-driven format. Now our state will be related to what the motors are doing. In our simple square-walker there are only two states, going forward or turning right. We can store those in an integer and use names for the different states, like this.
const int GoingForward = 1;
const int GoingRight = 2;

int State = GoingForward;
We need a rule to tell the program how to move between states. Our rule is simple. If you are in the forward state then the next state is turing right, else if are turning then the next state is going forward. Here is a straightforward version of this.
const int GoingForward = 1;
const int GoingRight = 2;

int State = GoingForward;
unsigned long Time = 0;

void Forward(int time) {
    PWMSetTime(LeftMotor, kLeftCCW);    // left counterclockwise
    PWMSetTime(RightMotor, kRightCW);   // right clockwise
}

void Left(int time) {
    PWMSetTime(LeftMotor, kLeftCW);     // left clockwise
    PWMSetTime(RightMotor, kRightCW);   // right clockwise
}

void Right(int time) {
    PWMSetTime(LeftMotor, kLeftCCW);    // left counterclockwise
    PWMSetTime(RightMotor, kRightCCW);// right counterclockwise
}

void Back(int time) {
    PWMSetTime(LeftMotor, kLeftCW);      // left clockwise
    PWMSetTime(RightMotor, kRightCCW); // right counterclockwise
}

void setup() {
    pinMode(LeftMotor, OUTPUT);
    pinMode(RightMotor, OUTPUT);
    Forward();                  // Now state and reality match
    Time = millis() + 2000;     // Go forward for 2 seconds
}

void Loop() {
    if (millis() >= Time) {         // Timer expires
        if (State == GoingForward) {
            //
            //  Start to turn, adjust state, and reset timer
            //
            Right();
            State = GoingRight;
            Time = millis() + 240;  // Will stay going right for 240mS
        } else if (State == GoingRight) {
            //
            //  back to going forward. Adjust state and reset timer for 2s.
            //
            Forward();
            State = GoingForward;
            Time = millis() + 2000;
        }
    }
}
This is a little more complex than our original walking in a circle program. There is always overhead associated with event-driven programming. It seems clumsy for short programs but we will soon see that it makes sense as programs get more complex.
So far, we have only one kind of event, the expiration of a timer. Once we add whiskers to the system we have another kind of event possible–a whisker can be hit. If it is a kind of event then we can handle it in the same way. We will add another test to loop and add some more states to our system.
When we have only two states that simply alternate there is not much planning needed. Once we move to more states and more kinds of event then we start to need more careful planning. We have actually already met a method to describe systems with several states and transitions between them. We met the state-diagram or bubble-diagram back in book 1 when we were looking at synchronous machines. We will use that notation now.
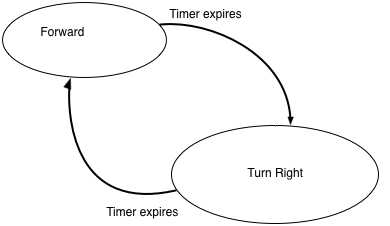
Once we have whiskers we must decide what to do with them. For now I will stick to the rules that we made up earlier. When a whisker is hit you go backwards and turn towards that side a little. Then you go back to trying to walk in a square. Let’s try to build a state-diagram for this. We start with the simple square walker. With only two states and one kind of event the diagram is rather simple.
Once we add whiskers we have three different kinds of event. To avoid the diagram getting too complicated I will use different colors for the different events, rather than putting in text labels. Here is the result.
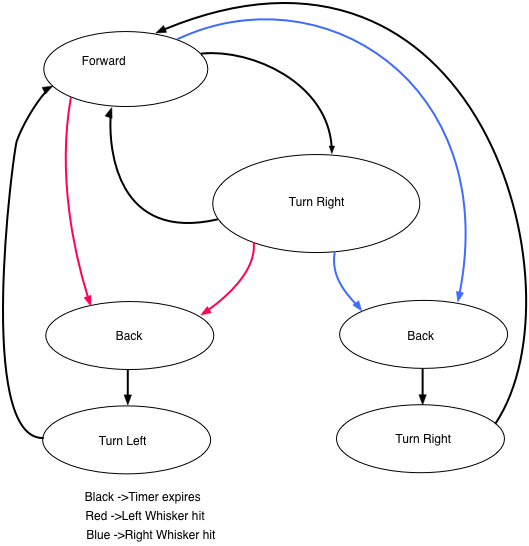
In addition to the increased complexity, the striking thing about the new state diagram is that some states occur multiple times. From the point of view of control that is impossible–we need to rename some of the states so that they are unique. But then we will have several different states each of which requires the robot to move in the same way. Thus it makes sense to separate the robots actions from the states that choose the actions. I can do this by splitting the state information into two pieces, one that corresponds to the position in the diagram (the state) and one that corresponds to the behavior of the robot. I will call this latter the action. Here is the new state diagram.

Now the states are labelled in black by their role, either as part of the regular pattern or as part of an evasion pattern. The actions are labelled in red and we see that the same action can show up in more than one state. As I mentioned earlier, we will now re-write the program to separate these two forms of processing, deciding which state to go to and deciding what to do about it. Thus we will have two decision trees inside our loop and each will be rather longer. Once the decision trees get this long it becomes a good idea to use the switch statment in C++ (refresh your memory in chapter ??).
//  Our states
const int Pattern1 = 0;
const int Pattern2 = 1;
const int Evade1 = 2;
const int Evade2 = 3;
const int Evade3 = 4;
const int Evade4 = 5;

//  Our actions
const int Halt = 0;
const int GoForward = 1;
const int GoLeft = 2;
const int GoRight = 4;
const int Reverse = 5;

int State = Pattern1;
int Action = GoForward;
unsigned long Time = 0;

void Forward(int time) {
    PWMSetTime(LeftMotor, kLeftCCW);    // left counterclockwise
    PWMSetTime(RightMotor, kRightCW);   // right clockwise
}

void Left(int time) {
    PWMSetTime(LeftMotor, kLeftCW);     // left clockwise
    PWMSetTime(RightMotor, kRightCW);   // right clockwise
}

void Right(int time) {
    PWMSetTime(LeftMotor, kLeftCCW);     // left counterclockwise
    PWMSetTime(RightMotor, kRightCCW); // right counterclockwise
}

void Back(int time) {
    PWMSetTime(LeftMotor, kLeftCW);         // left clockwise
    PWMSetTime(RightMotor, kRightCCW);  // right counterclockwise
}

void setup() {
    pinMode(LeftMotor, OUTPUT);
    pinMode(RightMotor, OUTPUT);
    Forward();                              // Now state and reality match
    Time = millis() + 2000;     // Go forward for 2 seconds
}

void Loop() {
    //
    //  Whisker events take priority over timer events so we process them first.
    //
    if (WhiskerStrikeLeft()) {
        State = Evade1;
        Action = Reverse;
        Time = millis() + 1000;
    } else if (WhiskerStrikeLeft()) {
        State = Evade3;
        Action = reverse;
        Time = millis() + 1000;
    } else if (millis() >= Time) {  // Timer expires
        //
        //  First we process our state. Here we set the next state, choose our
        //  action, and specify how long it will last.
        //
        switch (State) {
        case Pattern1:
            State = Pattern2;
            Action = GoRight;
            Time = millis() + 240;  // Will stay going right for 240mS
            break;

        case Pattern2:
            State = Pattern1;
            Action = GoForward;
            Time = millis() + 2000;

        case Evade1:
            State = Evade2;
            Action = GoLeft;
            Time = millis() + 200;

        case Evade2:
            State = Pattern1;
            Action = GoForward;
            Time = millis() + 2000;

        case Evade3:
            State = Evade4;
            Action = GoRight;
            Time = millis() + 200;

        case Evade3:
            State = Pattern1;
            Action = GoForward;
            Time = millis() + 2000;
        } // end switch(State)
    } // end if
    //
    //  Now take action.
    //
    switch (Action) {
    case GoForward:
        Forward();
        break;

    case GoLeft:
        Left();
        break;

    case GoRight:
        Right();
        break;

    case Reverse:
        Back();
        break;
    } // end switch(Action)
} // end loop
This now makes loop so long that it would probably be a good idea to package the state chooser and the action chooser up as individual subroutines and call them from loop to improve readability.
NOTE: In this case the actions are very simple. It was scarcely worth separating them from the state choices. In more complex situations the actions can be much more complex and it will make more sense to isolate them in one place. Even here we could improve the program by removing the Forward() etc. functions and just writing them in the action switch.
The event-switching section of the previous program is highly repetitive. It seems as though there ought to be a more compact way to write that code. Each case has exactly the same form, assign the new state, assign the current action, and set the next duration. It seems as though we ought to be able to say something like this
            State = nextState(State);
            Action = nextAction(State);
            Time = millis() + nextTime(State);
and let the next… functions figure out chat values to use. Since State is a simple integer with a small, compact, domain this is actually a perfect place to use arrays. An array is a collection of items, all of the same type, that can be accessed by index. Consider the following declaration.
    int NextState[6] = { Pattern2, Pattern1, Evade2,
                                             Pattern1, Evade4, Pattern1 };
then the line
State = nextState(State);
will change the state according to exactly the same rules as the program. Let’s see why.
Consider the time when State is Pattern2, represented by the integer 1. When we go to our array we find that the entry in slot 1 is Pattern1 (remember that indices start from 0). So if we arrive with State=Pattern2 then the assignment will shift the state to Pattern2, exactly as we wish.
We can handle the actions and times in exactly the same way. Each gets an array and we put the values from the big “switch (State)” into right slots in the arrays.
    int NextAction[6] = { GoRight, GoForward, GoLeft,
                                                GoForward, GoRight, GoForward };
    int NextTime[6] = { 240, 2000, 200, 2000, 200, 2000 };
With these changes our program can be a lot shorter.
//  Our states
const int Pattern1 = 0;
const int Pattern2 = 1;
const int Evade1 = 2;
const int Evade2 = 3;
const int Evade3 = 4;
const int Evade4 = 5;

//  Our actions
const int Halt = 0;
const int GoForward = 1;
const int GoLeft = 2;
const int GoRight = 4;
const int Reverse = 5;

//  The state tables
int NextState[6] = { Pattern2, Pattern1, Evade2,
                                         Pattern1, Evade4, Pattern1 };
int NextAction[6] = { GoRight, GoForward, GoLeft,
                                            GoForward, GoRight, GoForward };
int NextTime[6] = { 240, 2000, 200, 2000, 200, 2000 };

//  Variables representing the state
int State = Pattern1;
int Action = GoForward;
unsigned long Time = 0;

void setup() {
    pinMode(LeftMotor, OUTPUT);
    pinMode(RightMotor, OUTPUT);
    Forward();                          // Now state and reality match
    Time = millis() + 2000; // Go forward for 2 seconds
}

void Loop() {
    //
    //  Whisker events take priority over timer events
    //  so we process them first.
    //
    if (WhiskerStrikeLeft()) {
        State = Evade1;
        Action = Reverse;
        Time = millis() + 1000;
    } else if (WhiskerStrikeLeft()) {
        State = Evade3;
        Action = reverse;
        Time = millis() + 1000;
    } else if (millis() >= Time) {  // Timer expires
        //
        //  Advance to next state in normal course of operation.
        //
        State = NextState[State];
        Action = NextAction[State];
        Time = millis() + NextTime[State];
    } // end if
    //
    //  Now take action.
    //
    switch (Action) {
    case GoForward:
        PWMSetTime(LeftMotor, kLeftCCW);    // left counterclockwise
        PWMSetTime(RightMotor, kRightCW);   // right clockwise
        break;

    case GoLeft:
        PWMSetTime(LeftMotor, kLeftCW);     // left clockwise
        PWMSetTime(RightMotor, kRightCW);   // right clockwise
        break;

    case GoRight:
        PWMSetTime(LeftMotor, kLeftCCW);     // left counterclockwise
        PWMSetTime(RightMotor, kRightCCW); // right counterclockwise
        break;

    case Reverse:
        PWMSetTime(LeftMotor, kLeftCW);      // left clockwise
        PWMSetTime(RightMotor, kRightCCW); // right counterclockwise
        break;
    } // end switch(Action)
} // end loop
So far we have treated the whiskers as polled resources (though we have mentioned using interrupts to set variables for polling). Since the loop runs all the time and never takes more than a few microseconds this gives us excellent response time. However, it does not make the best use of the interrupt. An interrupt routine should be very short and must not make use of timers or other interrupt driven services, but it can certainly set a few variables. All that we do to respond to the whiskers is alter the values of a few variables. We can remove the whisker processing into interrupt handlers instead of the main loop. We have to set up the interrupts in setup() which thus gets a little more involved. But loop gets tidier.
//  Our states
const int Pattern1 = 0;
const int Pattern2 = 1;
const int Evade1 = 2;
const int Evade2 = 3;
const int Evade3 = 4;
const int Evade4 = 5;

//  Our actions
const int Halt = 0;
const int GoForward = 1;
const int GoLeft = 2;
const int GoRight = 4;
const int Reverse = 5;

//  The state tables
int NextState[6] = { Pattern2, Pattern1, Evade2,
                                         Pattern1, Evade4, Pattern1 };
int NextAction[6] = { GoRight, GoForward, GoLeft,
                                            GoForward, GoRight, GoForward };
int NextTime[6] = { 240, 2000, 200, 2000, 200, 2000 };

//  Variables representing the state
int State = Pattern1;
int Action = GoForward;
unsigned long Time = 0;

//
//  Whisker processing interrupts.
//  Each forces the system into an evade state.
//
void DoLeftWhisker(void) {
    State = Evade1;
    Action = Reverse;
    Time = millis() + 1000;
}

void DoRightWhisker(void) {
    State = Evade3;
    Action = reverse;
    Time = millis() + 1000;
}

void setup() {
    pinMode(LeftMotor, OUTPUT);
    pinMode(RightMotor, OUTPUT);
    Forward();                      // Now state and reality match
    Time = millis() + 2000;     // Go forward for 2 seconds
    attachInterrupt(LeftWhisker, DoLeftWhisker, FALLING);
    attachInterrupt(RightWhisker, DoRightWhisker, FALLING);
}

void Loop() {
    if (millis() >= Time) { // Timer expires
        //
        //  Advance to next state in normal course of operation.
        //
        State = NextState[State];
        Action = NextAction[State];
        Time = millis() + NextTime[State];
    } // end if
    //
    //  Now take action.
    //
    switch (Action) {
    case GoForward:
        PWMSetTime(LeftMotor, kLeftCCW);    // left counterclockwise
        PWMSetTime(RightMotor, kRightCW);   // right clockwise
        break;

    case GoLeft:
        PWMSetTime(LeftMotor, kLeftCW);     // left clockwise
        PWMSetTime(RightMotor, kRightCW);   // right clockwise
        break;

    case GoRight:
        PWMSetTime(LeftMotor, kLeftCCW);     // left counterclockwise
        PWMSetTime(RightMotor, kRightCCW); // right counterclockwise
        break;

    case Reverse:
        PWMSetTime(LeftMotor, kLeftCW);      // left clockwise
        PWMSetTime(RightMotor, kRightCCW); // right counterclockwise
        break;
    } // end switch(Action)
} // end loop
This is a much more elegant and much more extensible solution than the simple procedural program with which we started. It is both more and less readable. Because it is shorter it is much easier to see how all the pieces fit together. However, the state flow is no longer explicit but must be decoded from the NextXXXXXX[] tables. When this is worth while is a question of style and judgement. As programs grow more complex you may see the benefit from a more formal programming style such as this.
In an earlier section we found that we could get rid of some of the switch statements
and replace them with data structures, essentially with arrays. I called this a
data-driven programming style. The last step in making this a more flexible
and data-driven program would be to get rid of the Action switch. In order to
do this we have extend our understanding of C/C++ a little bit.
We have become familiar with the idea of a procedure as a piece of canned code that can be called many times in many ways, thanks to the magic of parameters. However, a procedure is also a piece of data. That is, it is an object with a name that can stored in a variable and even passed as an argument to another procedure. This makes it possible to do some very fancy things in C/C++. In particular, it will allow us to have an array of functions, or at least pointers to functions, just as we can have an array of any other value.
We know that, inside the computer, everything is stored as patterns of bits. The bits
are stored in byte-sized chunks and a single value may be spread over several bytes.
For example, an int in Energia is a 32-bit value that takes up 4 bytes. We can pack
several ints into an array precisely because all ints are exactly the same size. This
means that if you know the location of the first element in an array of ints then you
can trivially find the find the location of any other element.
The actual stored form of a function is also just a bunch of bytes but each function will take up a different number of bytes.